Gift Ideas With Clay Kids Can Make – The Joy of Gifting
Most family members enjoy a personalized DIY gift from our youngest. Here are some great gift ideas with clay for Christmas kids can make. We made lipstick holders, Christmas ornaments, a clay pot, and candle holders. All can be done by kids and adults.
Is Christmas all about shopping for gifts? Or is it not really about that at all We all enjoy receiving a gift, we are born with that ability. But to give and make someone happy is something we need to learn from our parents when we are kids. With the parent’s enthusiasm for gifting, a child learns while watching us. We need to be their role model.

Our gift ideas with clay kids can make
Every year since my kids were babies I tried to make gifts for the family that was personalized and made by kids. With my help of course. As they grow up, my girls take it a step further and enjoy gifting friends and family.
I prepared for you some step-by-step air-dry clay projects.
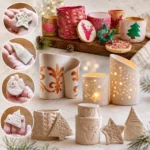
#1 AIR DRY CLAY CANDLE HOLDER DIY

We did those for the first time when my Bella was 3 years old. It was an aunt and uncle’s Christmas gift and I must say that they were amazed.
Here are the steps:

- Roll the clay with a roller
- Cut it about 7 inches long with your craft knife, and one side 1,5 and the second 3 inches as I did on the photo
- Use a straw, a toothpick, or any other tool to make holes that will shed a beautiful light from your candle holder
- Wrap the sides and merge them with some clay tools. You can wet your fingers to soothe the edges so they are seamless
- Roll another piece of clay to make your base
- Put the first peace on it to make the exactly shaped bottom as your upper part is
- Cut the excess
- Again use the tools and fingers to merge two pieces
- Let it dry
- Grind with some sandpaper to even all the bumps
- If you make it higher you can place some paper roll tube inside to hold it straight up until it dries
- Paint on air-dry clay as desired. Kids can use felt-tip pens, watercolors… sprinkle some glitter, whatever. To me, they are gorgeous in white
- Varnish or not. I didn`t. The rustic look gives it some charm
I made a video tutorial on our air dry clay easy ideas as I am more of a visual person, so I wanted to make it easier for you.

RELATED: Make a unique collage photo frame
#2 Air Dry Clay Pot
No matter if you are making DIY gifts for a friend’s anniversary, birthday, or Christmas gift… For the young and the adult… These pots are very useful and personalized gifts that all can use. It can be a pen, toothpick or lipstick holder, dish container, or just a decorative pot in your living room.
Here is how we did it:
- Just follow the steps in the previous section for a clay candle holder
- Size is up to you and your kid’s abilities
- You can imprint different shapes for it to look unique – hearts, butterflies, or just some dots or kid’s fingerprints all over


#3 DIY Kid Ornaments for Christmas
Make some personalized kids’ ornaments. The youngest enjoy making those. They are small, easy to handle, make, and color. You can see our ideas with clay for Christmas tree decorations.


RELATED ARTICLE: I Love You, Dad card – Free templates
I prepared 2 recipes for homemade ornaments:
1. MAKE IT OUT OF CLAY
- We all have cookie cutters, right?
- Just let the kids roll out some clay and cut shapes: hearts, Santa, and stars…
- You can even cut some shapes yourself as we did it – a house, a Christmas tree… You don`t need a cutter for those. They will be amazing when done by hand. You can imprint the doors, the windows, and the roof. It will be easier for kids to color it later and it will give them a unique touch
- Don`t forget to drill a hole at the top so you can put a nice ribbon for hanging
- When dried kids can color as desired
- What we love to do is write a personalized message in the background. You can imagine the look on Granny’s face when she read: “You are my sunshine!” ;-).

2. SALT DOUGH for ORNAMENTS RECIPE
Salt dough for ornaments is the best substitute for clay. Here is how you do it:
- 1 cup of salt
- 2 cups of flour
- 1 cup of warm water
- tablespoon of oil
- add some food coloring if you like
- knead the dough and continue as previously described in the clay section for ornaments
- Let dry on its own before decorating
ONE USEFUL TIP
Put the salt into the water first, and stir, so it disolves faster. You will get a smoothest dough ever!

The clay version Is much more durable, but the effect is pretty much the same. Just get on with what you have at home. Both versions are meaningful and thoughtful gifts.
These clay gift ideas can come in handy as:
- DIY gifts for anniversary
- To wish a happy birthday to grandma or a friend
- DIY Christmas gift for a teacher or for the end of the year
- Or just as a last-minute DIY gift
Conclusion
So those were our ideas with clay for personalized gifts. We have many more of those up our sleeves and will surely share them with you soon.
Enjoy crafting with your creative kids and wish you all the Happiest Holidays ever!


More for you to read and create:
How to teach a child the joy of gifting
- Talk to your kids about the importance of gifting. The best way is by showing an example – when they see how much you enjoy giving, they will learn it too. The kindness within them will surface soon enough.
- Be excited about giving a gift, let them see how it fulfills you emotionally
- Show them it is not about the money. It`s about making something with their own hands, cooking a meal, picking up a flower, or offering some help when needed. If you are a generous and loving person, your kids will mimic your actions and be more like you someday
- The endorphin and dopamine rush they experience when giving a gift is something they will not easily forget, and will want more
- They will develop a sense of empathy that will make a stronger bond with their family or friends.
- Generous people have stronger mental health, better mood, less stress, better physical health, well-developed self-esteem, and even live longer!
- It is similar when teaching your kids to share as we mentioned once.
Clay Gift Ideas Kids Can Make
Supplies
- Air-dry clay
- Rolling pin
- Craft knife or child-safe cutting tool
- Straw or toothpick
- Cookie cutters
- Paint markers, or watercolors
- Glitter optional
- Ribbon for ornaments
- Sandpaper optional
- Varnish optional
Method
- Cover the table.
- Prepare the clay and tools.
- Help younger kids with cutting and sharp tools.
- Cover the table.
- Prepare the clay and tools.
- Help younger kids with cutting and sharp tools.
- Let kids decorate freely.
- Roll the clay with a roller
- Cut it about 7 inches long with your craft knife, and one side 1,5 and the second 3 inches as I did on the photo
- Use a straw, a toothpick, or any other tool to make holes that will shed a beautiful light from your candle holder
- Wrap the sides and merge them with some clay tools. You can wet your fingers to soothe the edges so they are seamless
- Roll another piece of clay to make your base
- Put the first peace on it to make the exactly shaped bottom as your upper part is
- Cut the excess
- Again use the tools and fingers to merge two pieces
- Let it dry
- Grind with some sandpaper to even all the bumps
- If you make it higher you can place some paper roll tube inside to hold it straight up until it dries
- Paint on air-dry clay as desired. Kids can use felt-tip pens, watercolors… sprinkle some glitter, whatever. To me, they are gorgeous in white
- Varnish or not. I didn`t. The rustic look gives it some charm
- Roll the clay.
- Shape it into a small pot.
- Smooth the edges with wet fingers.
- Add fingerprints or imprinted shapes.
- Let it dry.
- Paint or decorate.
- Prepare cookie cutters in shapes you desire.
- Just let the kids roll out some clay and cut shapes: hearts, Santa, and stars…
- You can even cut some shapes yourself as we did it – a house, a Christmas tree… You don`t need a cutter for those. They will be amazing when done by hand. You can imprint the doors, the windows, and the roof. It will be easier for kids to color it later and it will give them a unique touch
- Don`t forget to drill a hole at the top so you can put a nice ribbon for hanging
- When dried kids can color as desired
- What we love to do is write a personalized message in the background
Notes
Here is how we make it:
- 1 cup of salt
- 2 cups of flour
- 1 cup of warm waterA
- tablespoon of oil
- Add some food coloring if you like
- Knead the dough and continue as previously described in the clay section for ornaments
- Let it dry on its own before decorating


I love these clay candle holders. My kids enjoyed this project. Thanks!